
Chisel honing is a precise sharpening process using a honing guide to achieve razor-sharp edges. It ensures accuracy and consistency‚ essential for woodworking precision and efficiency.
1.1 Importance of Sharp Chisels in Woodworking
Sharp chisels are indispensable in woodworking for making precise cuts and preventing wood damage. Dull chisels require more force‚ increasing the risk of accidents and imperfect results. A honing guide ensures consistent sharpening‚ maintaining sharp edges that enhance woodworking efficiency and safety.
1.2 Brief Overview of Honing Guides and Their Role in Chisel Sharpening
A honing guide is a specialized tool designed to help maintain the correct angle during chisel sharpening. It ensures precision and consistency‚ preventing uneven edges. By securing the chisel at a fixed angle‚ the guide simplifies the sharpening process‚ allowing for controlled strokes across the whetstone. This mechanical alignment is crucial for achieving a razor-sharp edge‚ making honing guides indispensable for both professionals and hobbyists seeking optimal results in woodworking projects.
Tools and Equipment Needed for Chisel Honing
Essential tools include a honing guide‚ sharpening stones‚ and lubricants. Optional accessories like angle jigs and diamond plates enhance precision. These tools ensure accurate sharpening and extend chisel longevity.
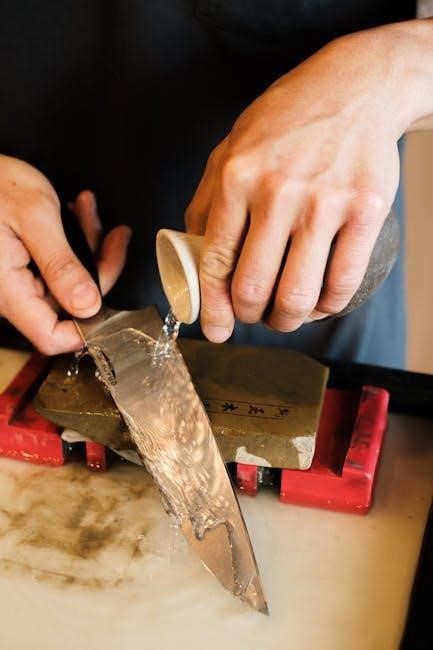
2.1 Essential Tools: Honing Guide‚ Sharpening Stones‚ and Lubricants
A honing guide is crucial for maintaining precise angles during sharpening. Sharpening stones‚ such as waterstones or diamond stones‚ are used to refine the chisel edge. Lubricants‚ like water or oil‚ prevent overheating and ensure smooth sharpening. Together‚ these tools are fundamental for achieving a sharp‚ durable edge. They work synergistically to maintain chisel efficiency and longevity‚ making them indispensable for woodworking tasks. Proper use of these tools ensures consistent results.
2.2 Optional Accessories: Angle Jigs and Diamond Plates
Angle jigs and diamond plates are optional but highly beneficial accessories for chisel honing. Angle jigs provide additional precision in maintaining consistent bevel angles‚ while diamond plates offer a durable‚ aggressive sharpening surface. These tools enhance the sharpening process‚ allowing for finer control and faster results. They are particularly useful for achieving intricate edge geometries and are often preferred by experienced woodworkers for their versatility and efficiency in refining chisel edges.

Preparing the Chisel for Honing
Preparing the chisel involves inspecting the edge for damage or dullness and cleaning it to remove debris. Securing the chisel properly ensures safety and precise sharpening.
3.1Inspecting the Chisel Edge for Damage or Dullness
3.1 Inspecting the Chisel Edge for Damage or Dullness
Inspecting the chisel edge is crucial before honing. Check for nicks‚ chips‚ or dullness using a magnifying glass or light. A dull edge appears matte and lacks sharpness‚ while damaged areas may have visible cracks or unevenness. Identifying these issues ensures effective sharpening and prevents further damage during the honing process. Proper inspection guarantees a smooth and accurate sharpening session.
3.2Cleaning and Securing the Chisel for the Honing Process
3.2 Cleaning and Securing the Chisel for the Honing Process
Cleaning the chisel is essential to remove debris and old sharpening residue. Use a solvent or mild soap and water to wipe the edge and bevel. Dry thoroughly to prevent rust. Secure the chisel firmly in a honing guide or jig to maintain stability during sharpening. Proper alignment ensures consistent results. A clean‚ stable chisel edge is critical for achieving a sharp‚ even finish during the honing process.

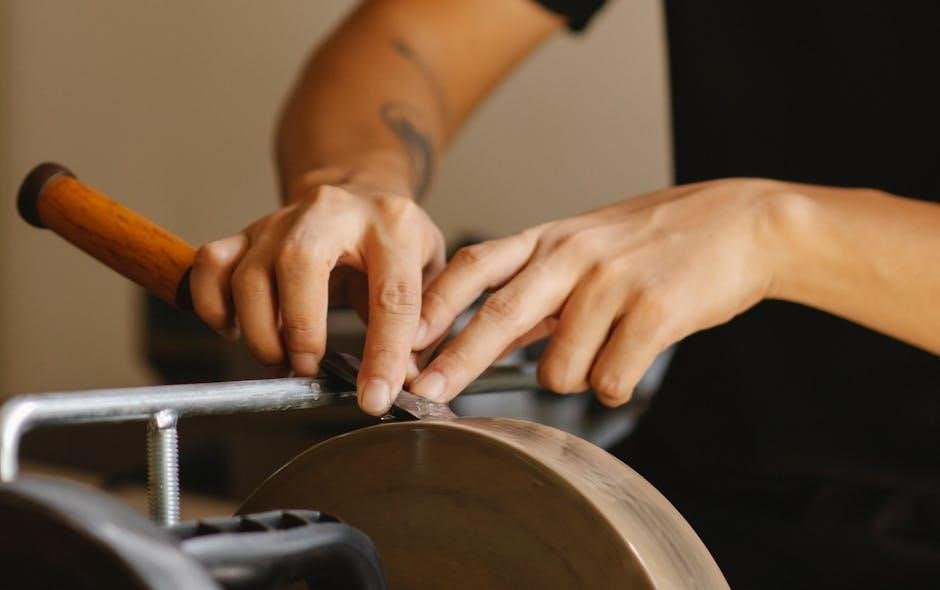
Using the Honing Guide Effectively
Adjust the honing guide to your desired angle and maintain consistent strokes across the whetstone; This ensures precise edge alignment and prevents uneven sharpening‚ enhancing accuracy and control.
4.1Setting Up the Honing Guide for Accurate Angle Control
4.1 Setting Up the Honing Guide for Accurate Angle Control
Setting up the honing guide begins with aligning the chisel edge at the desired angle. Use the guide’s adjustment mechanism to secure the angle firmly. Ensure the roller or pivot point is correctly positioned to maintain stability. This setup guarantees precise control‚ allowing for consistent strokes and even sharpening across the whetstone. Proper alignment is crucial for achieving the optimal bevel angle and a razor-sharp edge. Always double-check the angle before starting the honing process to ensure accuracy and avoid unnecessary adjustments later.
4.2Aligning the Chisel Edge with the Whetstone
4.2 Aligning the Chisel Edge with the Whetstone
Aligning the chisel edge with the whetstone is critical for effective sharpening. Place the chisel in the honing guide‚ ensuring the edge is parallel to the whetstone. Hold the chisel firmly and move it in smooth‚ light strokes across the stone. Maintain consistent angle control to achieve an even bevel. Proper alignment prevents uneven sharpening and ensures the edge remains straight and sharp. This step is essential for achieving professional-grade sharpness and prolonging tool longevity.
Sharpening Techniques with a Honing Guide
Use smooth‚ light strokes to sharpen the chisel edge‚ maintaining consistent angle control. Apply moderate pressure and periodically check the edge’s sharpness to avoid over-sharpening.
5.1Basic Stroke Patterns for Even Edge Sharpening
5.1 Basic Stroke Patterns for Even Edge Sharpening
Apply smooth‚ consistent strokes using the honing guide to ensure even sharpening. Start from the heel and move towards the edge‚ maintaining light pressure. Repeat the process‚ flipping the chisel periodically to achieve a balanced edge. This technique prevents uneven wear and ensures a sharp‚ precise cutting surface for optimal woodworking performance.
5.2Achieving the Desired Bevel Angle
5.2 Achieving the Desired Bevel Angle
To achieve the desired bevel angle‚ adjust the honing guide to the specific angle required for your chisel. Use the guide to maintain consistent contact with the sharpening stone. Lightly draw the chisel across the stone‚ using the same stroke pattern. Check the angle periodically with a marker or gauge to ensure accuracy. Consistent pressure and alignment are key to achieving a precise‚ sharp edge without over-sharpening.

Maintaining the Honed Edge
Proper storage and regular touch-up sharpening are crucial for maintaining a chisel’s edge. Use a honing guide for minor edge refinement to preserve sharpness and performance over time.
6.1Storing the Chisel to Prevent Dullness
6.1 Storing the Chisel to Prevent Dullness
Proper storage is essential to maintain the sharpness of your chisels. Store them in a protective case or bag to prevent contact with other tools that might cause dulling.
Keep chisels in a dry place to avoid rust‚ which can degrade the edge. Regular touch-ups with a honing guide will help maintain the edge quality and performance of your chisels over time.
6.2Touch-Up Sharpening to Maintain Edge Quality
6.2 Touch-Up Sharpening to Maintain Edge Quality
Regular touch-up sharpening is crucial for maintaining a chisel’s edge quality. Use a honing guide to ensure precision during quick sharpening sessions. Light strokes on a fine-grit stone can refresh the edge without excessive metal removal. Inspect the chisel after each use to determine if a touch-up is needed. Consistent maintenance prevents dullness‚ ensuring optimal performance in woodworking projects. This routine extends the life of the tool and enhances overall workshop efficiency.
Safety Considerations
Safety is paramount when honing chisels. Always wear protective gloves and safety goggles. Ensure a clean‚ well-lit workspace. Keep loose clothing tied back and avoid distractions to prevent accidents.
7.1Handling Sharp Tools Safely
Handling sharp tools requires utmost care to prevent injuries. Always grip chisels firmly‚ away from the cutting edge. Use a honing guide to maintain control and avoid accidental cuts. Store chisels in protective sleeves or on magnetic strips when not in use. Never leave sharp tools unattended or within reach of children. Regularly inspect tools for damage‚ as nicks or breaks can lead to unpredictable behavior during sharpening. Keeping your workspace clean and well-lit further enhances safety by reducing tripping hazards and improving visibility. Additionally‚ wearing safety goggles and gloves provides an extra layer of protection against potential hazards. By adhering to these practices‚ you can ensure a safe and efficient sharpening process. Always maintain focus during the honing process to avoid distractions that might lead to accidents. Proper tool handling not only safeguards your safety but also prolongs the life of your tools. Regular maintenance and storage are key components of a safe woodworking environment.
7.2Preventing Accidents During the Honing Process
Preventing accidents during honing requires careful preparation and attention to detail. Always secure the chisel firmly in the honing guide to maintain control and stability. Keep loose clothing or long hair tied back to avoid entanglement. Ensure the workspace is clean and well-lit‚ minimizing tripping hazards. Use safety goggles to protect your eyes from potential debris. Avoid overreaching or applying excessive pressure‚ as this can lead to loss of control. Regularly inspect the chisel and sharpening tools for damage‚ as nicks or wear can cause unpredictable behavior. By following these precautions‚ you can significantly reduce the risk of accidents and ensure a safe sharpening process. Proper technique and focus are essential to preventing mishaps while honing. Always maintain a steady hand and keep your attention on the task at hand.

Troubleshooting Common Issues
Common issues during honing often arise from improper techniques or tool misuse. Identifying and addressing these problems promptly is crucial for maintaining edge quality and preventing further damage.
8.1Identifying and Correcting Uneven Bevels
8.1 Identifying and Correcting Uneven Bevels
Uneven bevels often result from inconsistent sharpening strokes or misalignment with the whetstone. To correct this‚ inspect the edge under light to spot unevenness. Adjust the honing guide to ensure proper alignment and use controlled‚ uniform strokes. Periodically check progress and switch between coarse and fine stones as needed. This method ensures a balanced edge and prevents further irregularities‚ enhancing the chisel’s performance and longevity in woodworking tasks.
8.2Addressing Chisel Edge Damage During Sharpening
8.2 Addressing Chisel Edge Damage During Sharpening
If the chisel edge becomes nicked or cracked during sharpening‚ stop immediately to assess the damage. Light nicks can be removed by honing with a coarse stone‚ while deeper damage may require regrinding the edge. Always use a honing guide to maintain proper angle control and prevent uneven wear. Regular touch-ups and proper technique minimize the risk of edge damage‚ ensuring the chisel remains sharp and reliable for woodworking tasks.